Git flow with Jenkins and GitLab


At work I recently helped a team to transition from TFS to using Git as their source control management. After introducing the members to Git, we also established a common workflow on how we wanted to have Git integrate with Jenkins and GitLab. Below is our current implementation.
You might be interested in my latest "Implementing the git flow" article as well.
Git branching strategies
Git branching strategies are guidelines on how to use git’s branching mechanism for your development. Establishing such a shared convention is especially useful for having a common vision in the team, in order to have everyone steer in the right direction.
There are a couple of git branching strategies around which I’d not like to go into the very details right now. The interested among you might want to consider some of these links
Making git-flow work on Jenkins and GitLab
At work, one of our teams recently switched from TFS to Git where we decided to adopt a “git-flow” similar style of working, having
masterbeing the main development branch,productionbeing the one containing the production releases,story/<storyname>being feature branches per userstory- …and some other support branches for preparing releases, hotfixes etc.
These branches get published onto our internal Git server powered by GitLab. What we obviously wanted as well is to integrate this strategy with our Jenkins build server, having
- each checkin on master being automatically deployed in a staging/dev environment
- each checkin to a
story/branch to be build and verified against the .Net and JavaScript unit tests (and in the future integration tests as well, hopefully) - each checkin to
production/to be build, tested and automatically deployed in a “production-like” environment which is currently only visible to the client, but in the future intended to be accessed by all users
Based on the above assumptions we currently create one Jenkins job per environment, one for master, one for the user story branches and one for production (although I have the feeling Jenkin’s build parameterization could help out here to avoid redundancy between the build configurations…but didn’t look into that, yet). Let’s take a look at the master configuration as the others can be easily deduced starting from that one.
1. Source Code Management - Git Configuration
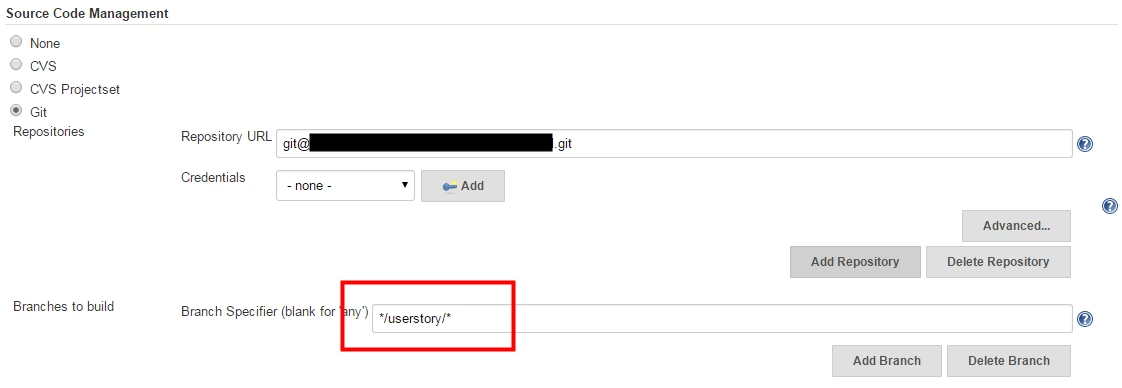
Before starting, make sure you have the Jenkins Git plugin. Then create a new Jenkins job, and in the “Source Code Management” section configure your Git repository like in the img example below.

In the Branch Specifier field, enter your desired branch, depending on which one you’re going to build in this current job. For master simply enter */master, for building your feature/userstory branches (and given you start them with story/<name>), enter */story/* and so on.
2. GitLab Webhook
The next step is to add a web hook to GitLab. This is needed s.t. GitLab is able to signal to Jenkins about new commits that have been “pushed” to the repository. This is an alternative, but much more efficient way of instead doing a continuous polling.
Just go to your repository settings and then to Web Hooks.

Enter an url of the form http://myjenkins.com/git/notifyCommit?url=git@mygitlabserver.com:myrepo.git.
3. Activate polling
The final step is to setup polling. Hä? Sorry, didn’t you just mention previously that we don’t need polling ‘cause GitLab calls Jenkins in case of new commits?? Yep, that’s right, but that’s part of a “security” measure the guys creating the Git plugin introduced to make sure you (that you control the Jenkins job) and you (that you added the Web Hook) both consent to execute the build based on new commits.
This will scan all the jobs that’s configured to check out the specified URL, the optional branches, and if they are also configured with polling, it’ll immediately trigger the polling (and if that finds a change worth a build, a build will be triggered in turn.) We require the polling configuration on the job so that we only trigger jobs that are supposed to be kicked from changes in the source tree. Source
However, in the polling configuration you don’t have to specify any kind of interval, meaning that it won’t start by its own. You simply tick the checkbox “Poll SCM” to give your consent (somehow).

That’s it, now your Jenkins jobs should start based on the branch you configured in your job and based on the branch that gets pushed to GitLab, just as we wanted.
Alternative approaches
In case you just need to trigger the build of a branch from GitLab, you can also simply configure Jenkin’s remote trigger and add that as a Web Hook to your GitLab repo

The downside of this approach is that you’re not able to selectively launch builds based on commits on certain branches.
Finally, I also found a plugin called GitLab Hook which I didn’t try yet as the above described approach was much simpler (and didn’t require the installation of a plugin). On their page they write that
For GitLab […] For Gitlab there is an existing solution that might work for you. You can just use the notifyCommit hook on Git plugin like this. […] But, with a large number of projects that are mostly polling (no hooks), the project might actually be built with a great delay (5 to 20 minutes). You can find more details about notifyCommit and this issue here. GitLab Hook plugin page
I did not experience any of such delays so far, but we’ll see.
Automatically build all feature branches
Not only with Git flow, but in general when you work with feature branches and Merge/Pull requests it makes a lot of sense to automatically build those on your build server and execute the tests in order to make sure those branches would pass the build pipeline. There are different strategies for doing so.
One possibility is to establish a naming convention for feature branches like a common prefix, i.e. feat-<name> or fix-<name>. In that way it is possible to selectively create Jenkins build jobs that monitor those branches:

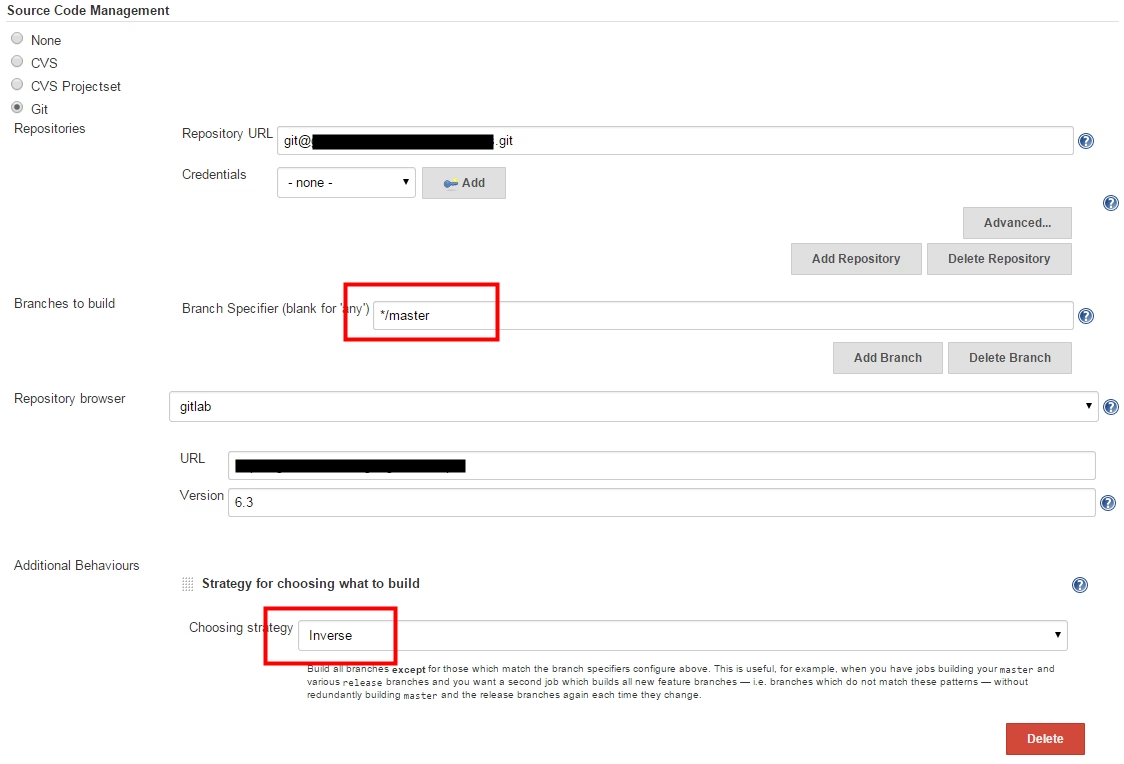
The other strategy is to simply build all branches other than master (probably a more naive approach).
- Under “Source Code Management” choose Git
- Click the “Add” button towards the end of the plugin section and choose “Strategy for choosing what to build”
