From ng-controller to components with Angular 1.5


The web has moved forward and so should you. Learn how to upgrade your Angular 1 app from a more MV* architecture to a cleaner, more component oriented approach. We will learn about how to refactor your code properly and about the new features introduced in Angular 1.5+ that will help you succeed along this path.
The App
I’ve created a series of Plunks which you can use to play around with the code by yourself. So here’s our initial app, a very simple one, just enough to showcase some concepts we’re going to explore.
Step 1: Remove/Avoid $scope
Ok, $scope was a central element in Angular since the beginning. It’s the glue between your Angular controller and the HTML template. Unfortunately scope is going away in Angular version 2+. There won’t be anything similar there. That’s why the “controller as” syntax has been introduced a while back also in Angular 1. So let’s do it. Here’s what John Papa proposes in his popular Angular 1 styleguide.
// before
angular.module('plunker').controller('HomeController', function ($scope) {
  $scope.message = 'Hi from home';
});

// after
angular.module('plunker').controller('HomeController', function () {
  var vm = this;
  vm.message = 'Hi from home';
});
The “controller as” syntax also extends to the HTML. In the router configuration of our angular app, we add the controllerAs property and set it to vm.
// before
    $stateProvider
      .state('home', {
        url: '/',
        templateUrl: 'home/home.html',
        controller: 'HomeController'
      })
      ...

// after
    $stateProvider
      .state('home', {
        url: '/',
        templateUrl: 'home/home.html',
        controller: 'HomeController',
        controllerAs: 'vm'
      })
      ...
And consequently we also have to update our HTML code:
<!-- Before -->
<h1>Home</h1>
<p>{{ this.message }}</p>

<!-- After -->
<h1>Home</h1>
<p>{{ vm.message }}</p>
Great, so here’s our app after the change:
Step 2: Convert your controller to a directive
How is our controller bound to the view? There are different possibilities, one is through the ng-controller tag in the HTML directly, like
<div ng-controller="HomeController as vm">...</div>
In our app it’s the router, however:
$stateProvider
    .state('home', {
      url: '/',
      templateUrl: 'home/home.html',
      controller: 'HomeController',
      controllerAs: 'vm'
    })
    ...
Notice how we define a template and the corresponding controller. This is a very loose coupling. Theoretically we could use one controller for multiple HTML templates easily. That’s considered bad practice, though. Also, this hinders reusability, because one has to know which template and which controller belong together in order to be able to reuse them in another situation. So let’s change that and stick them together. How? By writing a directive and converting our controller into a directive controller. We have different options:
.directive('home', function() {
  return {
    restrict: 'E',
    scope: {},
    template: 'home/home.html',
    controller: HomeController,
    controllerAs: 'vm'
  }
});

function HomeController() {
  ...
}
Heads up: We’re using an isolated scope (
scope: {}) for our “components”, because we want them to be fully isolated.
Our routing gets simplified, in that it doesn’t have to know the template location and/or the controller, but simply the HTML tag <home>.
$stateProvider.state('home', {
  url: '/',
  template: '<home></home>',
});
That was easy, right.
Step 3: Go further. Use Components!
Angular 1.5+ is the best Angular ever so far. Since v1.5 they introduced the new component syntax which makes creating components super easy. Check out Todd Motto’s article on the topic:
Angular 1.5 introduced the .component() helper method, which is much simpler than the .directive() definition and advocates best practices and common default behaviours.
So what does that mean for our app? Let’s see.
// before
.directive('home', function() {
  return {
    restrict: 'E',
    scope: {},
    template: 'home/home.html',
    controller: HomeController,
    controllerAs: 'vm'
  }
});

// after
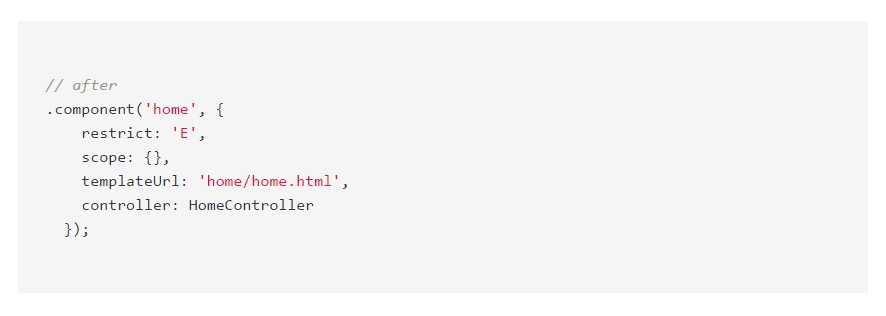
.component('home', {
    restrict: 'E',
    scope: {},
    templateUrl: 'home/home.html',
    controller: HomeController,
    controllerAs: 'vm'
  });
We can also remove the controllerAs property. This is an optional one. Angular 1.5 components expose the controller to the view through the $ctrl property.
// after
.component('home', {
    restrict: 'E',
    scope: {},
    templateUrl: 'home/home.html',
    controller: HomeController
  });
…and then in the HTML
<h1>Home</h1>
<p>{{ $ctrl.message }}</p>
Was that everything?
Not at all, Angular 1.5 components have to offer a lot more.
bindToController and bindings
When you create directives and pass data into them, you have to define a scope property, right?
.directive('myDirective', {
   ...
   scope: {
      message: '='
   }
   ...
})
The problem is that at that point, within your directive controller, you’d have to access them through the $scope variable again, which we previously said should be avoided. Thus, the bindToController has been introduced which allows us to write the above like this:
.directive('myDirective', {
   ...
   scope: {},
   bindToController: {
      message: '='
   }
   ...
})
Much better, message will now be attached directly to our controller instance. Still, we have to create the isolate scope with scope: {} which isn’t the most elegant way of doing it. It gets better :smiley:. The new component syntax simplifies this into a single bindings property, which also creates an isolate scope behind the scenes. (Note we’re no more using .directive, but instead .component)
.component('myDirective', {
   ...
   bindings: {
      message: '='
   }
   ...
})
You can even get one way bindings
...
bindings: {
   message: '<'
}
...
Angular is known for it’s powerful two-way data-binding, but with the new release of Angular 1.5, we’ve got one-way data binding (one-directional) binding capabilities inside our Components and Directives.
Lifecycle hooks
Most remarkably a new set of lifecycle hooks have been introduced. Remember the following pattern suggested by John Papa’s famous styleguide?
.component('home', {
    ...
    controller: HomeController
  });

function HomeController() {
  var vm = this;
  vm.message = '';

  activate();

  /////////////////////////

  function activate() {
    vm.message = 'Hi from home';
  }
}
The activate method can be seen like the constructor, a place where to group your controller’s initialization code. Well with the new component syntax, you can make use of the $onInit hook function.
function HomeController() {
  ...
  vm.$onInit = activate;

  /////////////////////////

  function activate() {
    vm.message = 'Hi from home';
  }
}
There are other hooks, like $onChange, $onDestroy and so on. Rather than going into those details by myself, check out Todd Motto’s awesome article on the matter:
Lifecycle hooks are simply functions that get called at specific points of a component’s life in our Angular apps. They landed in Angular 1.5 and are to be used alongside the .component() method, and have slowly evolved over the last few versions to include some more powerful (and Angular 2 inspired) hooks...
Component architecture
What we’ve seen so far are the technical details about how you implement components. It’s however important to also understand the concept behind a component oriented development approach.
The main concept is to define isolated and autonomous components, with a given responsibility and clearly defined contracts in terms of which data flows in and out. Generally speaking, there are two main types of components you usually create, and different people give name them differently:
- smart components / stateful components - These are components that coordinate a set of “dumb component”. They connect with Angular services, fetch data or get invoked through routings.
- dumb components / stateless components - These are responsible for the immediate visual feedback. They define input bindings and callbacks and render the data they receive. Usually they’re not necessarily coupled to the application and are highly reusable.
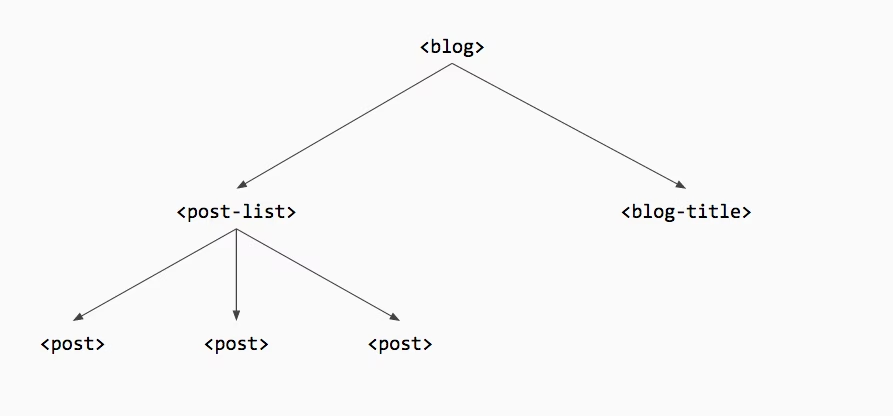
What you end with, is a so-called component tree, a set of nested components, starting from a top-level app component or root component.

So a “dumb component” (in every sense) in our sample app could look as follows:
angular.module('plunker').component('message', {
  bindings: {
    from: '<',
    msg: '<',
  },
  controller: MessageController,
  template: [
    '<p><strong>A message from {{ $ctrl.from }}:</strong></p>',
    '<p>{{ $ctrl.msg }}</p>',
  ].join(''),
});

function MessageController() {}
And be used within our “smart components” <home> and <about> (big words here :smiley:) like
<message from="'Home'" msg="$ctrl.message"></message>
Interested what role components play in Angular 2?
Then check out my video course with PacktPub which focuses on “Learning Angular components”.
The 2nd edition of my video course on Learning Angular Components
Also, for a quick, 20 minute intro to Angular 2+ (especially for beginners), you may want to check out my other article:
Since about half a year, I'm organizing a local Meetup group around Software Craftsmanship. I recently also published a video course on Learning Angular 2 directives and given Angular 2 finally released RC1, I decided to organize a Meetup session to introduce Angular 2 to our members.
Conclusion
What we’ve seen in this article:
- How to refactor
$scopeto thecontrollerAssyntax - How to convert an
ng-controllerstepwise towards directives and ultimately to components - We learned about the new
.componentsyntax introduced in Angular 1.5 and all the benefits we get from it - How to convert a MV* pattern like approach into a more component oriented approach
Summarizing, try to migrate your Angular frontend architecture towards a more component oriented approach. Regardless whether you plan to upgrade to Angular 2 at some point or not, it’ll help you anyway create much cleaner applications.
While this article didn’t deep dive into this topic, but is rather intended to give you a first overview, Tero Parviainen has written an in-depth version some time ago: Refactoring Angular apps to Component Style
Thanks to Gerard Sans for reviewing this article 👍